Saturday, December 31, 2016

Blue Ribbon Dreams

     In late October, I happened upon an August announcement of a quilt challenge, the Quilt the Blues Challenge, which required the purchase of a bundle of fabrics.  Since retiring at the end of June, and then traveling to Scotland in July, Hartford in August, White Plains in September and Princeton and Sarasota in October, I decided that a quilt challenge would be a good project for November! 
      The packet of blue fabrics arrived while I was in Florida, and I had to quickly come up with a plan in order to finish by the December 1 deadline.   I wasn't really fond of many of the fabrics - too grey, too ditzy, or too old fashioned floral-ly.    I used my camera settings to try to better guage the fabric values.  


     My design was to be a woven one, making ombre ribbons from the fabric selections.  I wanted to create four different ribbons, each using four of the 16 fabrics, arranging them dark to light, so the ribbons would read as the same.   I wanted a bold graphic pattern, and decided on an offset design. 
I ended up flipping the design so the ribbon ends were on the bottom and right edges of the quilt. 
     I don't have a computer design program, so I use graph paper and colored pencils to design.  I used my hand drawn pattern to calculate how many squares of each type I needed (and ended up making some adjustments at the end!)   I cut 2 1/2 inch strips to begin.  I used Kona white as the first of the allowed accent colors. 

Chester the Cat, assisting
     I sewed the strips into the distinct "ribbons", then cut into the sections to create the 12 inch finished blocks.

 I had to use my portable design wall to keep track of the woven pattern.
      Again, I used my camera settings to check on the consistency of the "ombre" look.
     I doing my checking, I discovered that I had sewn a few of the greyish strips with the back side showing. I was able to take out those pieces, and turn them around. 

     I made the ribbon ends from the remaining pieces, and the length was determined by how much fabric I had left! 
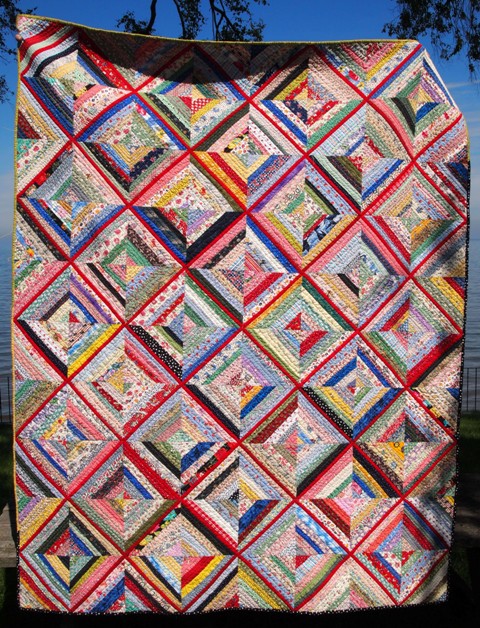
    It was very difficult to see the pattern when I was putting the blocks on the design wall, but from a distance, I thought I achieved the bold graphic look I was aiming for.
      I quilted the top on my Tiara II, using a free form line with occasional bubbles following the "grain" of the "ribbon".   I used a blue variegated Aurifil for the quilting on the "ribbon" portion.  I used a meandering stitch with bubbles for the white portions of the quilt, using a white Aurifil thread on the top.   I found quilting lengthy lines pretty challenging on the Tiara II.  More practice is needed! 


     I had some yardage of a nice golden umbrella print to use for the back, and used a gold Aurifil thread in the bobbin so the stitching would blend in.  I used a Kona Curry solid for the binding.  

     I got the quilt done and submitted in time, and got the acknowledgement that the submission had gone through.  I never heard anything more, and since finalists were going to be notified in mid-December, I guess I didn't make the cut.    Oh well - while some type of feedback would have been nice, I got a nice quilt out of it and a pattern I can fiddle around with!  The final quilt top finished at 60 1/2 x 72 1/2, but after quilting and washing, the final dimensions were 57 1/2 by 68 1/2.   


     2016 has been quite a year.   I am in the process of making a list of quilt goals for 2017, which will include some quilts for new babies expected in my extended family, and a good clean out of my burgeoning fabric stash.  I intend to update this blog more regularly!    May 2017 bring good quilts, and peace to all!  

Happy New Year!
Gretchen 

Friday, December 16, 2016

When Good Ideas Fail - The Pillow


     I have been saving selvedges for a bit now, inspired by the uses that can be made of these long strips. Added with some long fabric strips, too narrow for string quilts, I sewed the strips together when I had some mindless free time to create two large balls of  fabric "yarn".   My intention was to try to make a rag rug using this tutorial from Crazy Mom Quilts.    I really should have actually read the tutorial!


     However, I found myself at Joanne Fabrics with a coupon, and purchased a nice set of size 17 bamboo circular knitting needles, considerably smaller than recommended.  But, they actually worked okay.  
     I cast on 35 stitches, eyeballing the right width, and started knitting.  There was definitely some wrangling of the fabric from time to time, but it was a great project to do while watching what are apparently endless episodes of the Mindy Project on Hulu.   The width ended up being about 18 inches.
     Once I got to a certain point, when the piece was a square, I thought that it was so darn cute and scrappy looking that it shouldn't just be underfoot and getting dirty - but that I could show off this scrappy loveliness and make pillows from this piece.  So, I cast off, and made another similarly sized square.

     Earlier this year I experimented with canvas drop clothes and made a slipcover for an old couch that my son has in his apartment, and some grommet curtains for what was my daughter's room in my house.
This slipcover was made using only measurements from the couch and pictures.  Not great, but not bad considering that I didn't have the couch on site to make adjustments for a better fit.  
The grommet drapes (with lining)
        I thought I would use some of the left over scraps to make envelope backs for the pillows.   I have made plenty of pillow covers in my time, and so went about cutting the fabric for what would finish as a 16 inch square. Turns out, the pillow forms are 18 inches square, but down, so they smush! 
      I had a cream thread in my Bernina, and pinned the knit top to the backing.  Then I started sewing and realized that the top was pretty thick!  I carried on, until I  broke a needle.   Cleaned out the lint, rethreaded, replaced the needle, and started again.  Broke another needle, then another, and another and another.  Once I broke 6, I quit trying to sew this on my machine.  I actually thought about using my Tiara, but realized the knit top would not even begin to fit.     
     A quick finish was no longer possible.  I began to hand sew the knit piece to the backing, and finally finished one pillow.  It seems a bit lumpier than I had anticipated, and no longer seems so charming.  Not sure if that is because of the hand sewing, because the pillow form is too big, or because this was a ridiculous idea!  I will finish up the other one tonight (and may make a back to fit the 18 inch pillow, and see if a pair looks better than a single.   If not, I'll find some use for these pieces!  

       Have a wonderful holiday!  

Take care,
Gretchen 


Friday, December 9, 2016

ZING!

     Finally finished with this quilt!  Unfortunately, the snow and wind have arrived, so only inside pictures, which never are as nice as those in the sun.   
     This quilt has been a project for a long while.  I started in February 2016 pulling my red, orange and yellow scraps.  I needed some sunshine during the long winter.  I had some old scrap papers (standard 8 1/2 by 11 inch paper) and cut 1/2 inch off the bottom, making the paper 8 1/2 x 10 1/2.  I then drew lines up the middle, half from bottom left to top right, and half from bottom right to top left.    I wanted to try a string quilt with a rectangle base, versus a square base.  I like string quilts, and have made a scrappy string quilt previously.   

Prior string quilt

      I had loads of scraps to work with for the stringy side of the block, and used plain Kona white for the other half.
Just a sample of the scraps

I like the sharp edge using a paper template gives to the finished block, but I hate pulling out all of those paper pieces. What a mess!  
I then put together four of the blocks to make a bright zingy diamond.

                   
I used 16 of the big diamonds, which resulted in a nice size quilt.  I finished the top in April, but got very busy wrapping up things at work before I retired, and then began my summer and fall travels.  
The finished top
      I started pinning the quilt in October.  For some reason, this is the one aspect of quilting that I don't like and I end up pinning several quilts at once.  I use a craft table and binder clips to keep things taut.
     I decided to quilt this one very heavily, and tried out echoed paisleys on the white space using a really good tutorial from Melissa at Happy Quilting.  The link to the tutorial is here.  I used white Aurifil for these paisleys.   These took some time, but each square was manageable on its own.    This  quilt was on the quilting table (Baby Lock Tiara II) for quite a while! 

Close up of the paisleys
     I did all the paisleys first, then used a orange Aurifil for quilting the diamonds, which I did starting at the middle of each block and just going around the diamond shape over and over again, not paying particular attention to the distance between the lines of quilting or their straightness.    I had lots of threads to hide when I finished the quilt!  
 
      I wish the light was a bit better to show off the final quilting on the top.  It is very dense, and washed up quite nicely.   I now use Color Grabbers when I wash my quilts, especially with the white background.    I highly recommend taking that extra step to save lots of grief! 
 Since this is a scrap quilt, I patched together the backing, and also the binding.
I had sketched out my design for future reference.  
     Here is the finished quilt, on the floor.  It got wrinkled in the dryer!   

   I find that I pull out scrap quilts for my own use.  So, this is a quilt for me, and I expect it will bring lots of sunshine during the upcoming winter.
Enjoy December!  Happy Holidays!  I intend to start the New Year with a cleaned out quilting space, and lots of projects on my list!

Linking up to Crazy Mom Quilts Finish it up Friday.
Take care,
Gretchen