Sunday, April 21, 2013

Finishing the baby quilt -- sweet scalloped scraps!


The sweet baby quilt - it is finally nice enough outdoors for a photo!
 
   The baby quilt with the scalloped edges is done.  After completeing the top, and putting together a back, it was time to pin the  scrap baby quilt.  This is my least favorite part of quiltmaking - as you can see, my space is a bit cramped.   I only use this space for small quilts.  When I have to pin a larger quilt, I move the table up to a more spacious spot.

Luckily, the cutting table is on wheels, so I  can roll it around to squeeze by the washer and dryer. 


The top laid out, ready to pin before quilting.

 
     Once pinned, I decided on loopy free-motion quilting in the center panel, which I find an easy stitch to do.  I like to use Warm and Natural batting, and prewash my fabrics, so when the quilt is done and washed and dried, there is a wonderful texture to the finished quilt, and the quilting mistakes are not readily visible! 


A close up of the loopy quilting before washing.  
     I also tried two new techniques on this quilt.  First, a scalloped edge.  Using instructions in a recent Fons & Porter article, I made a template for the scalloped edges.  I used the kraft paper from the batting.  Next time, I'll make more defined scallops. These turned out a little too subtle for my taste.


The kraft paper template for the scalloped edge.  I pressed the paper before I traced it onto the quilt.
 
     I am fascinated by Hawaiian quilts, but have never tried one, so I decided to try echo quilting the border.  This turned out to be very difficult for me -- I was unable to stitch in a straight line, or keep my "echos" a consistent distance apart. 


The pretty awful echo quilting! 

    Despite these flaws, the final quilt looks pretty adorable.  I wish I had a bit more of the "scallop" on the edge, but overall,  I am very happy with how this turned out.


A close up of the final quilting after washing.  The curvy lines don't look as bad as I feared.


The full front of the quilt.

 
The back of the quilt.


    In the end, this turned out to be a sweet little quilt.

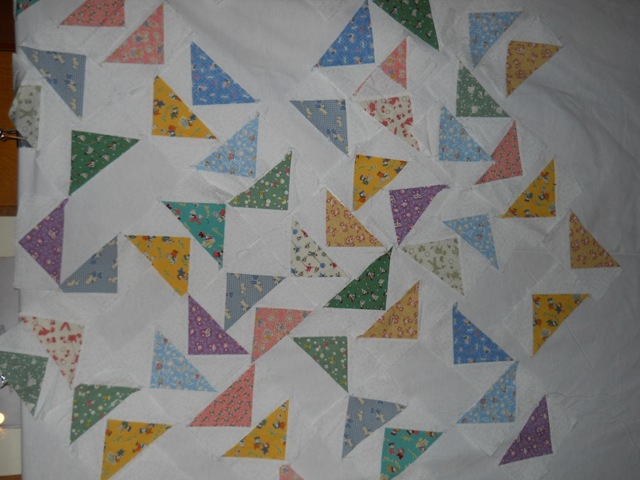
    What's next?    I have several projects underway.  I am getting those flying geese sewn together, and will be getting some large quilt tops ready for quilting.  (No echo quilting!) 

      I also resurrected the center panel I made years ago (I think in 2007) from a Jane Sassaman Free Spirit fabric line, using a drunkard's path template and trying my hand at curved piecing.    Once I put the blocks with the sashing, it languished.  Today I got it out, and pressed it, and need to decide whether to redo some seams to make it lay a bit flatter, and then, what to do for a border.   A narrow pink, and then a wide black border? A soft pink? A bright pink?   A narrow black border with a wide pink?  No border?  I have quite a bit to mull over before this one is done.  I'll keep you posted.
The partly completed quilt top.

 
A closer look at the fabric


Take care,
Gretchen


Sunday, April 14, 2013

Something old to something new

       During the cleanup of my fabric bins and scrap baskets, I found a number of finished blocks left over from earlier quilts.   I found so many flying geese units (many already sewn together) that I am not sure I even made a quilt with these.  These may be from an abandoned project, but not for long!   I took the sewn units apart, pressed them all, and have a plan for them, having seen some pictures of crazy flying geese quilts where the geese fly all over the quilt, instead of in the normal straight lines.   

Flying geese blocks that I had sewn together

Here are some of the flying geese taken apart


The flying geese on the design wall

      But, the flying geese quilt will have to wait. 
     My first leftover project is a quilt using these fence rail blocks, which were the remnants of several baby quilts I made for nieces and nephews.    I saw a baby quilt featured in a recent Fons & Porter magazine, and being inspired, decided to try my hand at a scalloped border quilt using up these leftovers.
Leftover blocks from various baby quilts
Close-up from a baby quilt from 2002

The full baby quilt


Jackson's baby quilt from 2012


        I sewed together the various blocks and then decided to make long strips of different widths and go with white as the background.  I like to put frames around center designs, and I found a light yellow fabric in my bins that seemed just right.  

The blocks sewn together provided material for two new quilts


The strips cut into two lengths  (3 1/2 and 1 1/2 inches) divided by white sashing

Adding the yellow frame

      I put a 6-inch white border around the framed piece, and will soon add the backing and will quilt it and try the scalloped border.  

The completed front of the quilt

      I also found a yellow fabric that I didn't really care for, and pulled it out to use as part of the backing. Does anyone else use unwanted and unloved fabrics for backing? I realized, however, that while I really disliked the yellow stiped fabric in any large quantity - it might make a wonderful binding. I love striped or polka dot bindings!   

The yellow stripe that will soon be the binding

    I plan to finish this quilt up soon. 

Take care,
Gretchen 

Sunday, April 7, 2013

Scrap Busting & Blogging

        Welcome to my blog!  I love to make quilts, and have baskets of scraps from nearly 15 years of quiltmaking.  It is time to get organized and do something with those scraps, and with the fabric I have accumulated over the years.  I also want to chronicle my quiltmaking journey, and create a gallery of my quilts.  My home is on a stretch of  Lake Erie that some fishermen refer to as Snug Harbor -- hence, the name of this blog. 
     The first project was to sort through the baskets of scraps: 
One of my many overflowing baskets of scraps
        I love looking at other quilting blogs, and I saw some string quilts that looked perfect for using up many of my scraps.  I decided to use a paper-piecing technique (using recycled copy paper), and sewed a 1/2 inch wide red strip down the middle of each block to hold the quilt together.  I just used random strips of random widths; my only "rule" was to avoid using the same fabric twice in a block.


Sewing the strips together.  The red strip was marked at 1/2 inch for all the blocks.


The untrimmed blocks  


Four trimmed blocks just placed together.


The finished quilt top.
          I love the finished top.  The red keeps the wild assortment of colors and prints together, and I have memories of many earlier quilts in each block.    In all, the quilt contains 80 blocks.  I ended up tearing out the paper piecing before sewing the blocks together.   This did help reduce my scrap stash--but certainly did not eliminate it!  I decided to go with some Ikea fabric as a backing - and my sister agreed to pick up some and ship it to me from her nearby Ikea.   I'll post a copy of the finished quilt when it is done.

     While I was sorting through my scraps, I found many forgotten extra blocks from earlier quilts. Next up will be some baby quilts using those blocks.

Take care,

Gretchen