Thursday, July 7, 2016

Baby Blocks!

     Life has been busy by the lake.  I recently wrapped up a long career while trying to finish up a baby quilt, which I have called Baby Blocks.  It will soon be gifted to baby Samantha, but when I started, I didn't know if the baby was a boy or a girl, and tried to design something that would work no matter what!
    I decided to try a square quilt, which can double as a play mat, and using a cute printed fabric as inspiration, picked some batiks I had in my stash.  As it turns out, I didn't use that green fabric!  I found a cute retro fabric I liked better for this project! 
      This is a great project for jelly rolls.  I cut 2 1/2 inch strips of the soft and bright colors, and paired them with similarly cut  Kona white strips. 
     I cut the two piece units to form two square blocks, and sewed strips together, varying the color placement pretty randomly.  Once I found the right mix, I used numbered pins to keep track!
      I then added long 2 1/2 inch strips of white to set off the blocks.
     After mulling (for too long)many quilting options in my mind, I decided done was the best choice and used my walking foot to outline the squares, adding extra lines in the white parts, leaving the colored blocks unquilted to pop! The picture above shows the unfinished quilting, the picture below, the finished piece. 
     I used a "mark be gone pen" to keep the starting line straight in the border.  I was concerned that it wouldn't come out in the wash.  It turns out I should have worried about the heavily dyed batiks more!   I do like how the quilting pattern created a shadow block in white on the border!
      I got some yardage of a Michael Miller Retro Candy Shop to use as the backing. Too cute!
      When I first washed and dried the quilt, the unthinkable happened, and when I pulled it out of the dryer, it was blotched with the hot pink and the bright yellow, which apparently had run in the wash! Yikes!   I ran to the store and got Carbona Color Run remover AND Carbona Color Grabber, and added both to the washing machine. (which was not either mentioned or recommended in the instructions, but I was a bit crazed)   Luckily - the products worked and removed the stains.   After a thorough drying, the finished quilt is nice and crinkly (and white). 
     Baby Samantha has a big sister Charlotte, and doesn't every little girl need a zipper bag!  
     I used 2 1/4 inch strips of the batiks for the binding.  I really like the overall look of this quilt.  The final quilt measures 42 inches square.  
    Now that I am retired,  I expect to be finishing up more quilts now that I am not working a regular job, but my days seem pretty busy already!   Another baby quilt is in the works - stay tuned.

   I appreciate your comments, and if you'd like to follow me on instagram, please do so - snugharborquilts.

Thanks for visiting, enjoy the summer and take care,
Gretchen


Sunday, June 26, 2016

Stars in the News - Mystery Quilt top, done!

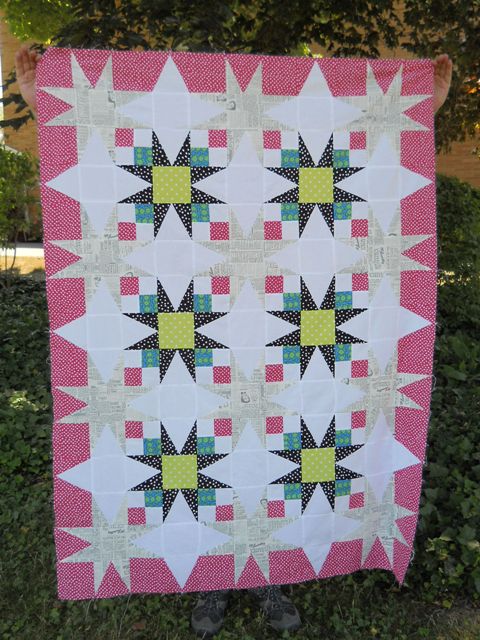
      The mystery quilt top, Starburst, (Mystery Quilt #12 from Quilters Club of America website) is complete.  I noted my progress and the beginnings of my mystery quilt in my last post.   I must admit that my enthusiasm for this project waned.  I usually really like my quilts, but I am not crazy about this one.   
     I think my angst is due to the color choices I made. The instructions indicated that the mystery quilt was designed with a medium background color.  I decided to use white - to give it a modern pop.  What I didn't do was adjust the #2 color - I was so keen to use the newsprint fabric, that I failed to notice that it was basically white as well!  
These originally looked compatible
With my notes. 
   As I reflect on this, a bright yellow for the #2 color instead of the newsprint or as the background color would have done the trick.   A learning experience for me!   
      The tri rec tool was interesting to work with.  It made for some nice points.  I just couldn't get the sizing quite right.  The pieced squares (which should have finished at 4 1/2 each, were a little larger than that.  I still struggle with consistent 1/4 inch seaming, and will keep working on it.  Next time, I'll trim the pieces to size. 
I should have redone these with a different fabric as soon as I saw how close the values were!  


This is an example of a solid 4/12 inch square over the top of a triangle unit.  The triangle unit was too big! 
     The starburst blocks turned out well.  (Although you can see the sizing remained a problem! ) I like the bright colors against the light, and the dark star points.   

The addition of the inner stars was the disappointing part.  That newsprint really didn't stand out at all from the white.  The picture below was the finished top of the challenge.  The directions then suggested a border with the blue and green print, but I didn't have enough of that in my stash, so I went with the pink dots.  

I strip pieced the blocks for the border. 
    Another shot of the finished top, which is a good size - about 44 x 60.    This is a quilt which looks better than it photographs, since the newsprint fabric shows up more close up than in the picture.  I will put this top in the line to be quilted.  I may bind it with the black dotted fabric.    The nice thing about quilts is that even the ones I am not crazy about are still warm on a winter's night!      

Take care, and enjoy the rest of June!

Gretchen