Quilts by Year

Saturday, December 7, 2013

Projects from Christmases Past

"Welcome to Santa's House" wall hanging.
     I haven't started any Christmas projects this year, but have done so in the past, although I only have pictures of a few, and even then, I am not sure of the dates. 
 
     Two of my projects came from a book or magazine entitled Quilt It for Christmas.  I haven't found the actual magazine yet (although I know it is around), but I did find a working copy I made.  The first project from that publication was a pattern for a table runner, but I modified it to be a wall handing.  I made several, and kept two for myself.  I thought the pattern was so cheerful and whimsical!  
A photo of my working copy of the pattern.
     An update:  I found the magazine.  1999 Quilter's Newsletter  Magazine's "Quilt It for Christmas"!
I wonder if I am considered a hoarder if I only keep quilt related magazines? 
A close up of the wall hanging.  I used a fusible interfacing to apply the houses and trees and stars to the  to the patchwork sky, and added extra batting to the snow piece to make it a bit fluffier.   I sewed little seed beads on as house lights, and other little metallic decorative pieces as tree toppers.
"Welcome to Santa's House" #2
     I used different scraps for each wall hanging.  This was a great little project to use up some scraps. 
A close up of the second hanging.  Different fabrics, same cute look!
     That magazine also had a pattern for an adorable Nativity wall hanging.  I believe I made several of these. The one pictured below is one I gave to my mother, who hangs it every December.  I didn't make one for myself.  I still have the pattern, so perhaps one day soon.

The magazine instructions.

The "Peace on Earth" wall hanging
A close up of  the little manger scene.  
     Like the Santa's House hangings, I used fusible interfacing for the figures, but for this project, I added a zig zag border to most of the pieces.   If I make these again, I will use a border of the fusible interfacing, not fuse the entire piece of fabric. 

   In 1994, before I was quilting, I was in need of a Christmas tree skirt.  I had two young children at home, so I purchased a large piece of white duck fabric, some red, green and gold fabric paint, and made a skirt and created some great memories.


The "Christmas Hands" tree skirt. 
   I had the kids dip the hands in the paint and press down on the fabric.  This was, as I recall, a rather messy project!   I later added gold squiggles and outlines to give it a bit of shine.  
A close up of the hands detail.
      I made sure to add the names and ages of my kids -


I am glad I remembered to add the date to this project. 
     When the paint was dry, I cut it into a large circle, and added some holiday fabric backing, as well as some green and gold fringe.   This has held up nearly 20 years!

 The back of the tree skirt. 
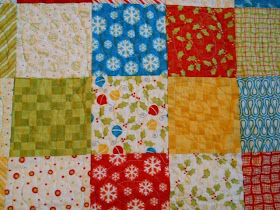
     One Christmas more recently, I made each child a quilt from layer cakes and yardage of a Christmas line whose name I cannot recall.   I cut the 10 inch squares into 5 inch squares, and just started sewing them together.
One of the two similar Christmas quilts.  Each ended up a very generous lap size. 
      I recall quilting late at night, and neglected to sign or date these quilts, which were done just before Christmas morning.   I liked that the colors were a little offbeat - with the bright blues and lime greens and bright golds.  
I quilted each block with a large swirl.


I quilted the wide border with a long vertical meandering pattern.

I found some nice wide gold star fabric for the backing of each, and used the some of the dotted fabric for the binding.
    I have two tops and backs finished and ready to pin and quilt, and have fabric pulled for several other quilts.  I hope to have a new finish soon to share.

Have a wonderful holiday season!
Take care,
Gretchen


Sunday, November 17, 2013

Snuggly Homespun Plaid Rag Quilts

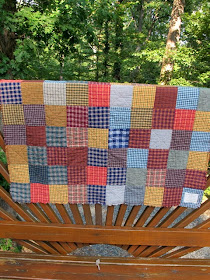
Andrew's homespun quilt- front
      In 2005, I made two birthday quilts.  One was a little lap quilt for my nephew Andrew on his 10th birthday.  The other was for my friend Pam, who was celebrating a birthday, too.  Both were rag quilts made from an assortment of homespun plaids.


The back of Andrew's homespun  rag quilt
    Each of the quilts was made of two squares of a homespun plaid or check, with a layer of batting in the middle.   The batting was 1/2" smaller all around than the homespun.  The pieces were machine quilted with a "X" pattern.  The finished squares were then sewn together so the extra 1/2" of fabric was all on the front.  That seam was then snipped at, I think, 1/2 or 1/4 inch intervals, for a raggy look. After washing, the snipped fabric turns into a soft snuggly border around each square.

 
A close-up of the squares on Andrew's quilt

The tag from Andrew's quilt
      Andrew's quilt is looking good.   Thank you to his mom, Veronica, for the wonderful photos.   I think the squares in his quilt were small, perhaps 4 or 5 inches finished.    Pam's quilt was bigger, with squares finished at 6 1/2 inches. 
 
     Pam's quilt has gotten lots of use in the past eight years.  It recently came back to me for some  repairs.   The fabric is very soft with all the washings.  Still cozy, although falling apart!    
The front of Pam's rag quilt before repairs.  The blues are photographing much brighter than they are.  You can see there are spots where the quilting is totally gone. 

The back of Pam's quilt.  The stitching is pretty well shot.
A close up of a spot needing some fixing.

Uh oh

There were a few seam issues, too.   This quilt was well loved! 
      The label, which I had originally attached to the quilt with fusible interfacing and hand-stitching, had fallen off, and was in sad shape. 
The quilt label
     It looked like I had used different color thread for the original quilting, which was done by individual squares.  For the repairs, I used my walking foot, and some tan thread, and restitched all the lines on the diagonal, sewing over the corner seams,  and also  fixed the loose seams. I also stitched around the perimeter of the quilt to keep it the sides from fraying too much further.   Some of the batting lumped up where the stitching had come apart, so I did my best to wrangle the batting flat before requilting.   In the end, I think it turned out pretty well.
    
The repaired quilt - perfect for a November morning!
The newly repaired old quilt!

A close up of the new "x"s

I sewed a border around the original label, used a fabric pen to retrace the words, and sewed it down to the quilt.   This label will NOT fall off again!
      I had forgotten how cozy these quilts could be.  I have a lot of leftover batting, which is perfect for cutting up into squares, and as you can see,  I still  have a healthy stash of homespun.  It may be time for another rag quilt!
Part of my homespun collection

More homespun scraps
 
Lots of homespun!
     I have been busy with many projects, including my baskets and making slipcovers for my nearly 30-year old wing chairs.  As soon as I can finish these projects - back to quilting!  I am itching to cut some fabric apart!

Enjoy the day!
Take care,
Gretchen 

Sunday, October 20, 2013

Baskets, Baskets, More Batik Baskets!

Batik Baskets Galore!
      A few weeks back, I got involved in trying my hand at making coiled clothesline fabric baskets.  My first attempt was laughable; my progress was noted in my previous post.
My first itty bitty fabric basket!
      Although my plan had been to use up scraps with these basket projects,  I made one of the earlier baskets with some batik fabric I had left over from a 2009 project. 
The batik fabric,which has deep red, blue and golden tan tones.


     I loved how the basket turned out from this fabric.  It was just what I had envisioned when I started this project.
The completed basket.  The batik colors photograph so differently in different lights.
     So much for scraps!  I headed out to the fabric store for some batiks.  I decided to see what I could do with a fat quarter.  I also found some clothesline which was a cotton with a poly core, which seemed to hold its shape much better than a 100% cotton line.  I also began to make the bottoms of the bowls a standard size (about 4 inches), and the bowls finished with 13 loops around.  The finished bowls are 2 1/2 inches high, and about 6 1/2 to 7 inches wide.

The first few batik baskets
     After I had made about a half dozen baskets, it occurred to me that I should take a picture of the batik before cutting into little 1/2 inch strips.   The batik pattern gets transformed so completely in the basket making.  I was attracted to patterns that had some good contrast.
Blue pink and purple batik.
The finished basket.  I used a purple thread on this one.
Yellow and light green batik.
The finished basket from that batik. 
I now have a stack of batik baskets. 
The sizes are pretty uniform
More of the baskets
     I ended up with some scraps from these baskets, usually one little strip or a bit more.  I also had a shorter length of rope and decided to make my own scrappy basket, trying out a much smaller (2 inch) base.
 
The leftover strips of the batik.  I cut the strips by eye, and I don't worry if the width is uniform.
My scrappy basket.  I used a multicolor bright thread on this basket.

Close up of the outside, which shows off the thread, and all the fabulous colors!

This shows the conical shape and smaller base.

      It is possible that some of the batik baskets will be given as gifts this Christmas.  This little scrap basket, however, is all mine!

     I haven't abandoned quilting!  I have two quilt tops finished, and have fabric for two more assembled and ready to cut.  

Enjoy the fall!
Take care,
Gretchen